
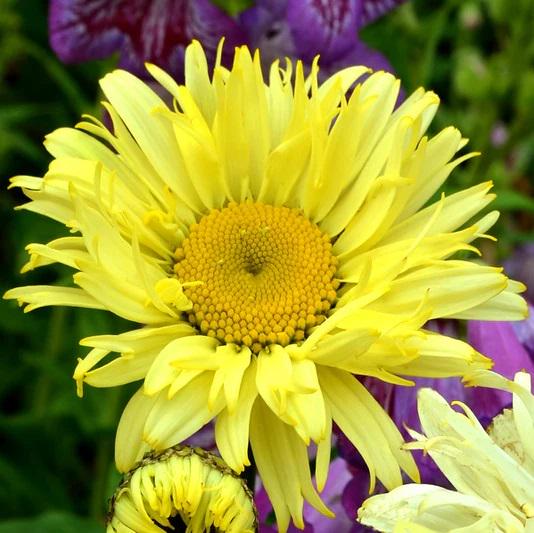
The Goldfinch Daisy (Coreopsis verticillata ‘Goldfinch’) is a beautiful, vibrant perennial flower that produces a profusion of bright, golden-yellow blooms. It’s a popular choice for gardens due to its cheerful color, long bloom time, and low-maintenance nature. This variety of coreopsis has fine, threadlike foliage and blooms that attract pollinators like bees and butterflies, making it a great choice for both ornamental and wildlife-friendly gardens.
1. Overview of Goldfinch Daisy
- Common Name: Goldfinch Daisy
- Scientific Name: Coreopsis verticillata ‘Goldfinch’
- Family: Asteraceae
- Type: Perennial
- Hardiness Zones: USDA Zones 3–9
- Mature Height: 18–24 inches (45–60 cm)
- Mature Spread: 18–24 inches (45–60 cm)
- Bloom Time: Late spring to early fall (May to September)
Goldfinch Daisy is known for its long-lasting, golden-yellow flowers that appear in abundance throughout the growing season. The flowers are daisy-like in shape, with long, narrow petals surrounding a dark center. It’s an easy-to-grow plant that requires minimal attention, making it a great addition to many garden settings.
2. Planting Goldfinch Daisy
Goldfinch Daisy is relatively simple to grow, as long as you provide the right environment.
When to Plant:
- Best Planting Time: Plant Goldfinch Daisy in early spring after the last frost, or in the fall, about 6 weeks before the first frost. Planting in these seasons allows the plant to establish strong roots before hot or freezing temperatures.
Where to Plant:
- Sunlight: Goldfinch Daisies require full sun to perform their best. A minimum of 6 hours of direct sunlight daily is ideal. The more sun they get, the more abundant and vibrant the blooms will be.
- Soil Requirements: Well-draining soil is essential for healthy growth. Goldfinch Daisy tolerates poor soil and is drought-tolerant once established, but it thrives in moderately fertile, sandy or loamy soil with a pH of 6.0 to 7.5. It does not like soggy, waterlogged soil.
- Space: These plants spread to about 18 to 24 inches, so it’s important to plant them with enough space to allow air circulation and avoid overcrowding.
Planting Process:
- Prepare the Planting Hole: Dig a hole that is twice as wide as the root ball of the plant but only as deep. Loosen the surrounding soil to encourage root growth.
- Place the Plant: Gently remove the Goldfinch Daisy from its container and place it in the hole. Make sure the top of the root ball is level with the surrounding soil.
- Fill and Water: Fill the hole with the native soil or a mix of native soil and compost to help improve drainage and nutrient content. Water the plant thoroughly after planting to settle the soil and remove air pockets.
3. Caring for Goldfinch Daisy
Once established, Goldfinch Daisy requires very little maintenance, but there are a few key care tasks to ensure it thrives.
Watering:
- Watering Needs: Goldfinch Daisy is quite drought-tolerant once it’s well-established, but it requires regular watering during the first year to establish a strong root system. After that, water it deeply during dry spells but allow the soil to dry out between waterings. Overwatering can cause root rot, so it’s important to avoid keeping the soil too wet.
- Draining Soil: Make sure the planting area has good drainage to prevent water from pooling around the roots.
Fertilizing:
- Moderate Feeding: While Goldfinch Daisy doesn’t require much in terms of fertilization, applying a balanced, slow-release fertilizer in the spring can encourage more vigorous growth and more blooms. A 10-10-10 fertilizer is a good option.
- Compost: Alternatively, adding a light layer of compost around the base of the plant each spring can provide additional nutrients without over-fertilizing.
Pruning:
- Deadheading: Deadheading spent flowers will encourage more blooms and prevent the plant from putting energy into producing seeds. Simply pinch or cut off the spent blooms.
- Cutting Back: In late fall, after the blooms have stopped, you can cut the entire plant back to about 4–6 inches from the ground. This will help prepare the plant for the next growing season.
- Spring Cleanup: In early spring, trim any dead or damaged stems from the previous year’s growth to make way for new shoots.
Mulching:
- A 2- to 3-inch layer of mulch applied in the spring or fall helps retain moisture, regulate soil temperature, and suppress weeds. Be sure to keep the mulch away from the stem to avoid rot.
4. Pests and Diseases
Goldfinch Daisy is generally pest and disease-resistant, but like all plants, it can occasionally face problems. Here are some common issues to look out for:
Pests:
- Aphids: These small insects suck sap from the leaves, potentially causing wilting or distortion. If you notice aphids, wash the affected areas with a stream of water or use insecticidal soap.
- Spider Mites: These tiny arachnids can be problematic in hot, dry conditions. They feed on the plant’s juices and leave tiny yellow spots on the leaves. If you see signs of spider mites, spray the plant with water or insecticidal soap.
- Slugs and Snails: These pests can damage young shoots and leaves. Hand-picking or using a slug bait can help manage these pests.
Diseases:
- Powdery Mildew: This fungal disease appears as white, powdery spots on the leaves. To avoid powdery mildew, ensure the plant has enough air circulation and water it at the base, rather than overhead.
- Root Rot: If the plant is kept too wet, it may develop root rot. Be sure to plant Goldfinch Daisy in well-draining soil and avoid overwatering.
- Leaf Spot: Fungal leaf spot diseases can cause dark spots on the leaves. If leaf spot becomes an issue, remove the infected leaves and avoid overhead watering.
5. Winter Care
Goldfinch Daisy is hardy in USDA zones 3–9, meaning it can withstand cold temperatures, though some care is needed during winter.
- Mulch: Apply mulch around the base of the plant before the first hard frost to help protect the roots from freezing temperatures.
- Cutting Back: In late fall, cut the plant back to around 4–6 inches above the ground to protect the crown from winter damage.
- Winter Dormancy: During the winter months, Goldfinch Daisy will go dormant. Don’t worry if it looks dead; it will start growing again in the spring when temperatures warm up.
6. Uses and Landscape Applications
Goldfinch Daisy is a versatile and attractive addition to various types of landscapes:
- Borders: Its compact size makes it perfect for planting along borders, paths, or flower beds.
- Wildlife Gardens: The bright yellow flowers attract pollinators like bees, butterflies, and birds, making it an excellent choice for wildlife-friendly gardens.
- Cut Flowers: The cheerful, long-lasting blooms make Goldfinch Daisy an excellent choice for cut flower arrangements. It can be used in fresh floral displays or dried for use in craft projects.
- Rock Gardens: Because of its small size and drought tolerance, it’s also a good choice for rock gardens or xeriscapes.
- Containers: Goldfinch Daisy grows well in containers, which makes it ideal for patios, balconies, or other small spaces.
7. Conclusion
Goldfinch Daisy (Coreopsis verticillata ‘Goldfinch’) is a charming, low-maintenance perennial that brings a burst of sunshine to your garden from late spring to early fall. With its vibrant yellow flowers, this plant attracts pollinators and enhances the landscape. It thrives in full sun and well-drained soil and requires minimal care once established. Whether used as a border plant, in a wildlife garden, or as part of a container display, the Goldfinch Daisy is sure to brighten up any garden or outdoor space.


Proudly powered by WordPress