
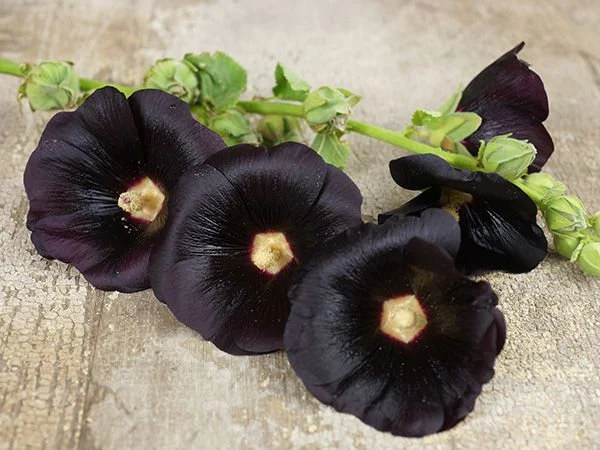
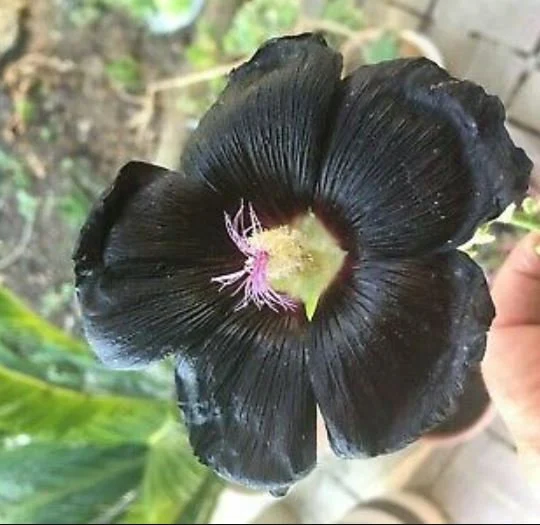
Black Hollyhock (Alcea rosea ‘Nigra’) is a stunning biennial or short-lived perennial known for its tall spikes of deep maroon to almost black flowers. These dramatic blooms add an elegant, old-fashioned charm to cottage gardens, borders, and along fences. Proper care ensures healthy growth, abundant flowering, and self-seeding for future blooms. Below is a detailed guide on how to grow and maintain Black Hollyhock successfully.
1. Understanding Black Hollyhock
Before planting, it’s essential to understand the basic characteristics of Black Hollyhock:
- Botanical Name: Alcea rosea ‘Nigra’
- Common Name: Black Hollyhock
- Plant Type: Biennial or short-lived perennial
- Mature Height: 5 to 8 feet
- Mature Width: 1 to 2 feet
- Bloom Period: Summer (June to August)
- Sun Requirements: Full sun to partial shade
- Soil Type: Well-draining, fertile, loamy soil
- Watering Needs: Moderate
- Hardiness Zones: USDA zones 3-9
- Attracts: Bees, butterflies, and hummingbirds
- Resistant To: Deer and rabbits
2. Choosing the Right Location
Selecting the right site is crucial for the healthy growth of Black Hollyhock:
- Sunlight:
- Prefers full sun (at least 6 hours of direct sunlight per day).
- Can tolerate partial shade, but flowering may be reduced.
- Soil Conditions:
- Needs moist, well-draining, fertile soil.
- Add compost or organic matter to enrich the soil.
- Avoid heavy clay soil, which can lead to root rot.
- Air Circulation:
- Plant in an area with good air circulation to prevent fungal diseases.
- Avoid overcrowding to reduce the risk of rust disease.
3. Planting Black Hollyhock
When to Plant
- Spring or Early Fall:
- Sow seeds in early spring after the last frost or in late summer to early fall for blooms the following year.
- Container-grown plants can be transplanted in spring or fall.
How to Plant from Seeds
- Prepare the soil by loosening it and incorporating compost for nutrients.
- Sow seeds directly in the garden, ¼ inch deep and spaced about 18-24 inches apart.
- Water lightly to keep the soil consistently moist but not waterlogged.
- Thin seedlings once they develop a few leaves, leaving the strongest plants about 18 inches apart.
- Mulch around seedlings to retain moisture and suppress weeds.
How to Plant from Transplants
- Dig a hole slightly larger than the root ball.
- Place the plant at the same depth it was growing in the container.
- Backfill with soil, firming it gently around the roots.
- Water thoroughly after planting.
4. Watering Requirements
Proper watering is essential for healthy Black Hollyhock growth:
- Newly Planted Hollyhocks: Water deeply 2-3 times per week until established.
- Mature Plants: Require moderate watering, about once a week.
- During Dry Spells: Increase watering frequency, ensuring the soil stays evenly moist.
- Avoid Overwatering: Excess water can lead to root rot and fungal diseases.
5. Fertilizing for Optimal Growth
Black Hollyhocks benefit from nutrient-rich soil and periodic feeding:
- Before Planting: Incorporate compost or well-rotted manure into the soil.
- Spring Feeding: Apply a balanced, slow-release fertilizer (10-10-10) when new growth appears.
- Midseason Boost: Use a diluted liquid fertilizer or compost tea to encourage flowering.
- Avoid Excess Nitrogen: Too much nitrogen can lead to excessive leaf growth with fewer flowers.
6. Pruning and Maintenance
Regular maintenance keeps Black Hollyhock healthy and looking its best:
- Deadheading: Remove spent flowers to encourage continued blooming and prevent excessive self-seeding.
- Staking: Tall plants may need staking to prevent bending or breaking in strong winds.
- Cutting Back: After flowering, cut the stalks down to ground level to promote new growth.
- Mulching: Apply a 2-3 inch layer of mulch around the base to retain moisture and suppress weeds.
7. Pest and Disease Management
While Black Hollyhocks are generally hardy, they can be susceptible to certain pests and diseases:
Common Pests
- Aphids: Small insects that suck sap from leaves; control with insecticidal soap or neem oil.
- Japanese Beetles: Can chew leaves and flowers; hand-pick or use traps.
- Spider Mites: Cause stippling and webbing on leaves; rinse with water or apply neem oil.
Common Diseases
- Rust Disease: A common fungal disease causing orange-brown spots on leaves.
- Improve air circulation by spacing plants properly.
- Avoid overhead watering.
- Remove infected leaves and dispose of them.
- Powdery Mildew: White, powdery fungal growth on leaves.
- Improve air circulation.
- Apply a fungicidal spray if necessary.
- Root Rot: Caused by poor drainage; plant in well-draining soil and avoid overwatering.
8. Overwintering Black Hollyhock
Since Black Hollyhock is biennial, it may require special care to survive the winter:
- Mulching: Apply a thick layer of mulch around the base to protect roots from freezing.
- Leave Foliage: Some gardeners prefer to leave dried stalks through winter for added protection.
- Reduce Watering: Water less frequently during dormancy.
- Self-Seeding: Allow some flowers to go to seed to encourage natural replanting for the next season.
9. Propagation Methods
Black Hollyhock is primarily propagated through seeds.
A. Collecting and Sowing Seeds
- Allow seed pods to dry on the plant.
- Harvest seeds once they turn brown.
- Store seeds in a cool, dry place until ready to plant.
- Sow directly in the garden in early spring or fall.
B. Division (Less Common)
- Mature plants can sometimes be divided in early spring, though this method is less reliable than seed propagation.
10. Companion Planting
Black Hollyhocks pair well with other cottage garden perennials:
- Foxgloves: Complement their height and add vertical interest.
- Delphiniums: Provide a striking color contrast.
- Lavender: Attracts pollinators and repels pests.
- Echinacea: Adds a splash of color and attracts beneficial insects.
- Roses: Create a romantic, vintage garden aesthetic.
Final Thoughts
Black Hollyhock is a breathtaking addition to any garden, offering dramatic blooms and attracting pollinators. With proper sun exposure, well-draining soil, and minimal care, these plants will reward you with beautiful flowers season after season. By following this guide, you can enjoy the elegance of Black Hollyhocks in your garden for years to come. Happy gardening!
Proudly powered by WordPress